Earlier today, I ran across a link pointing to the article below. At the time of this writing, the original site is having some errors and wouldn’t load the content (it may be back up in the future). Using the magic of the Internet Wayback Machine, I was able to get the content of this post again. I’m reposting it here for those who run into similar errors on the original site.
Original Post (3/3/2013):
Server security doesn’t need to be complicated. My security philosophy is simple: adopt principles that will protect you from the most frequent attack vectors, while keeping administration efficient enough that you won’t develop “security cruft”. If you use your first 5 minutes on a server wisely, I believe you can do that.
Any seasoned sysadmin can tell you that as you grow and add more servers & developers, user administration inevitably becomes a burden. Maintaining conventional access grants in the environment of a fast growing startup is an uphill battle – you’re bound to end up with stale passwords, abandoned intern accounts, and a myriad of “I have sudo access to Server A, but not Server B” issues. There are account sync tools to help mitigate this pain, but IMHO the incremental benefit isn’t worth the time nor the security downsides. Simplicity is the heart of good security.
Our servers are configured with two accounts: root and deploy. The deploy user has sudo access via an arbitrarily long password and is the account that developers log into. Developers log in with their public keys, not passwords, so administration is as simple as keeping the authorized_keysfile up-to-date across servers. Root login over ssh is disabled, and the deploy user can only log in from our office IP block.
The downside to our approach is that if an authorized_keys file gets clobbered or mis-permissioned, I need to log into the remote terminal to fix it (Linode offers something called Lish, which runs in the browser). If you take appropriate caution, you shouldn’t need to do this.
Note: I’m not advocating this as the most secure approach – just that it balances security and management simplicity for our small team. From my experience, most security breaches are caused either by insufficient security procedures or sufficient procedures poorly maintained.
Let’s Get Started
Our box is freshly hatched, virgin pixels at the prompt. I favor Ubuntu; if you use another version of linux, your commands may vary. Five minutes to go:
passwd
Change the root password to something long and complex. You won’t need to remember it, just store it somewhere secure – this password will only be needed if you lose the ability to log in over ssh or lose your sudo password.
apt-get update
apt-get upgrade
The above gets us started on the right foot.
Install Fail2ban
apt-get install fail2ban
Fail2ban is a daemon that monitors login attempts to a server and blocks suspicious activity as it occurs. It’s well configured out of the box.
Now, let’s set up your login user. Feel free to name the user something besides ‘deploy’, it’s just a convention we use:
The days of passwords are over. You’ll enhance security and ease of use in one fell swoop by ditching those passwords and employing public key authentication for your user accounts.
vim /home/deploy/.ssh/authorized_keys
Add the contents of the id_rsa.pub on your local machine and any other public keys that you want to have access to this server to this file.
Now test your new account logging into your new server with the deploy user (keep the terminal window with the root login open). If you’re successful, switch back to the terminal with the root user active and set a sudo password for your login user:
passwd deploy
Set a complex password – you can either store it somewhere secure or make it something memorable to the team. This is the password you’ll use to sudo.
visudo
Comment all existing user/group grant lines and add:
root    ALL=(ALL) ALL
deploy  ALL=(ALL) ALL
The above grants sudo access to the deploy user when they enter the proper password.
Lock Down SSH
Configure ssh to prevent password & root logins and lock ssh to particular IPs:
vim /etc/ssh/sshd_config
Add these lines to the file, inserting the ip address from where you will be connecting:
PermitRootLogin no
PasswordAuthentication no
AllowUsers deploy@(your-ip) deploy@(another-ip-if-any)
Now restart ssh:
service ssh restart
Set Up A Firewall
No secure server is complete without a firewall. Ubuntu provides ufw, which makes firewall management easy. Run:
ufw allow from {your-ip} to any port 22
ufw allow 80
ufw allow 443
ufw enable
This sets up a basic firewall and configures the server to accept traffic over port 80 and 443. You may wish to add more ports depending on what your server is going to do.
Enable Automatic Security Updates
I’ve gotten into the apt-get update/upgrade habit over the years, but with a dozen servers, I found that servers I logged into less frequently weren’t staying as fresh. Especially with load-balanced machines, it’s important that they all stay up to date. Automated security updates scare me somewhat, but not as badly as unpatched security holes.
apt-get install unattended-upgrades

vim /etc/apt/apt.conf.d/10periodic
Logwatch is a daemon that monitors your logs and emails them to you. This is useful for tracking and detecting intrusion. If someone were to access your server, the logs that are emailed to you will be helpful in determining what happened and when – as the logs on your server might have been compromised.
apt-get install logwatch

vim /etc/cron.daily/00logwatch
add this line:
/usr/sbin/logwatch --output mail --mailto test@gmail.com --detail high
All Done!
I think we’re at a solid place now. In just a few minutes, we’ve locked down a server and set up a level of security that should repel most attacks while being easy to maintain. At the end of the day, it’s almost always user error that causes break-ins, so make sure you keep those passwords long and safe!
There’s a great discussion happening over at Hacker News. Thanks for all the good ideas and helpful advice! As our infrastructure grows, I definitely plan on checking out Puppet or Chef – they sound like great tools for simplifying multi-server infrastructure management. If you’re on Linode like us, the above can be accomplished via StackScripts as well.
Updated May 22, 2017 – Updated for new AWS prompts. Fixed issues with static files.
Originally posted Nov 19, 2015
We all know Amazon Web Services frequently changes and updates their products and services. This post was originally written when all of the tutorials online for deploying Django to Elastic Beanstalk with PostgreSQL were outdated (using Python 2.7 and Django 1.7). There’s a few things that are different when deploying Python 3 to EB that weren’t widely known at the time. This tutorial is designed to help you easily deploy your web app. I’ve borrowed a few general ideas from here for this tutorial. As always, you can always check out the official documentation for the most up to date information.
I did this on a Mac running macOS Sierra 10.12.5. It should be the same on Linux. Sorry Windows users, you’ll have to adapt this tutorial to your needs, but I imagine it’d be very similar once you get your Python environment set up. In this tutorial I expect that you already have an Amazon Web Services account and are familiar with it’s basic functionality.
The local environment I used:
Python 3.6.1
Django 1.11.1
1. Preliminary Setup
This goes over basics of creating a virtual environment and creating a Django app. If you already have this done, you can skip this part.
I used a Python 3.6 virtualenv. You can install this using pip3 install virtualenv. You can then create and activate a Python 3 virtual environment using:
# Creates the environment
virtualenv -p python3 myenv
# Activates the environment
. myenv/bin/activate
Note: To deactivate your virtualenv just type deactivate at your command prompt.
Install your dependencies with pip. We’ll definitely need psycopg2. If you have any other pip dependencies. Install them now. We’ll also create a new homepage app.
pip install psycopg2 django mako
Create your Django site and add an app:
django-admin.py startproject my_eb_site
cd my_eb_site
python manage.py startapp homepage
Add the homepage app to the list of INSTALLED_APPS in your settings.py file. Migrate your database and run the server to make sure everything is working.
Git is required to deploy your web app to Elastic Beanstalk. If you haven’t already created a git repository in your root Django project folder, do so with the following commands (Make sure that you are in your project’s root directory!):
Elastic Beanstalk will upload your latest commit to the instance. Make sure you always commit your changes before deploying your your web app to Elastic Beanstalk. Otherwise you’ll deploy old versions of your web app to the server.
3. Getting ready for Elastic Beanstalk
You’ll need to install one more thing with pip in order to deploy your site to Elastic Beanstalk:
pip install awsebcli
This will install awsebcli and a host of dependencies. The package awsebcli, or EB Command Line Interface (CLI), is a tool that helps you deploy and manage your AWS Elastic Beanstalk applications and environments. It also provides integration with Git. You can view more info here. This package is currently at version 3.10.1 as of this writing.
You can check to make sure it’s working by running eb --version. You should get:
EB CLI 3.10.1 (Python 3.6.1)
Now we’re ready to proceed!
4. Setting up your Elastic Beanstalk Environment
Now that we’ve got the EB CLI installed, we can proceed. Let’s start by initializing our EB environment with the following command:
eb init
Note: If you’ve already setup your AWS CLI and have a specific profile to use, you can use it with the --profile flag. For example, if I wanted to use a profile called my-eb-user I would do the following:
eb init --profile my-eb-user
This will bring up a menu asking you to select which AWS data center you want your web app to be stored in.
Select a default region
1) us-east-1 : US East (N. Virginia)
2) us-west-1 : US West (N. California)
3) us-west-2 : US West (Oregon)
4) eu-west-1 : EU (Ireland)
5) eu-central-1 : EU (Frankfurt)
6) ap-southeast-1 : Asia Pacific (Singapore)
7) ap-southeast-2 : Asia Pacific (Sydney)
8) ap-northeast-1 : Asia Pacific (Tokyo)
9) sa-east-1 : South America (Sao Paulo)
10) cn-north-1 : China (Beijing)
(default is 3):
I chose option 3, US Oregon region.
If you haven’t set up the AWS CLI, the next prompt will ask you to put in your Amazon Access ID and Security Key for your account or IAM user.
If you DON’T get prompted to input these credentials, you probably already have these set up and you can move on to the next section. If you DO get prompted for these credentials, follow the directions in the next section.
5. Using an IAM User
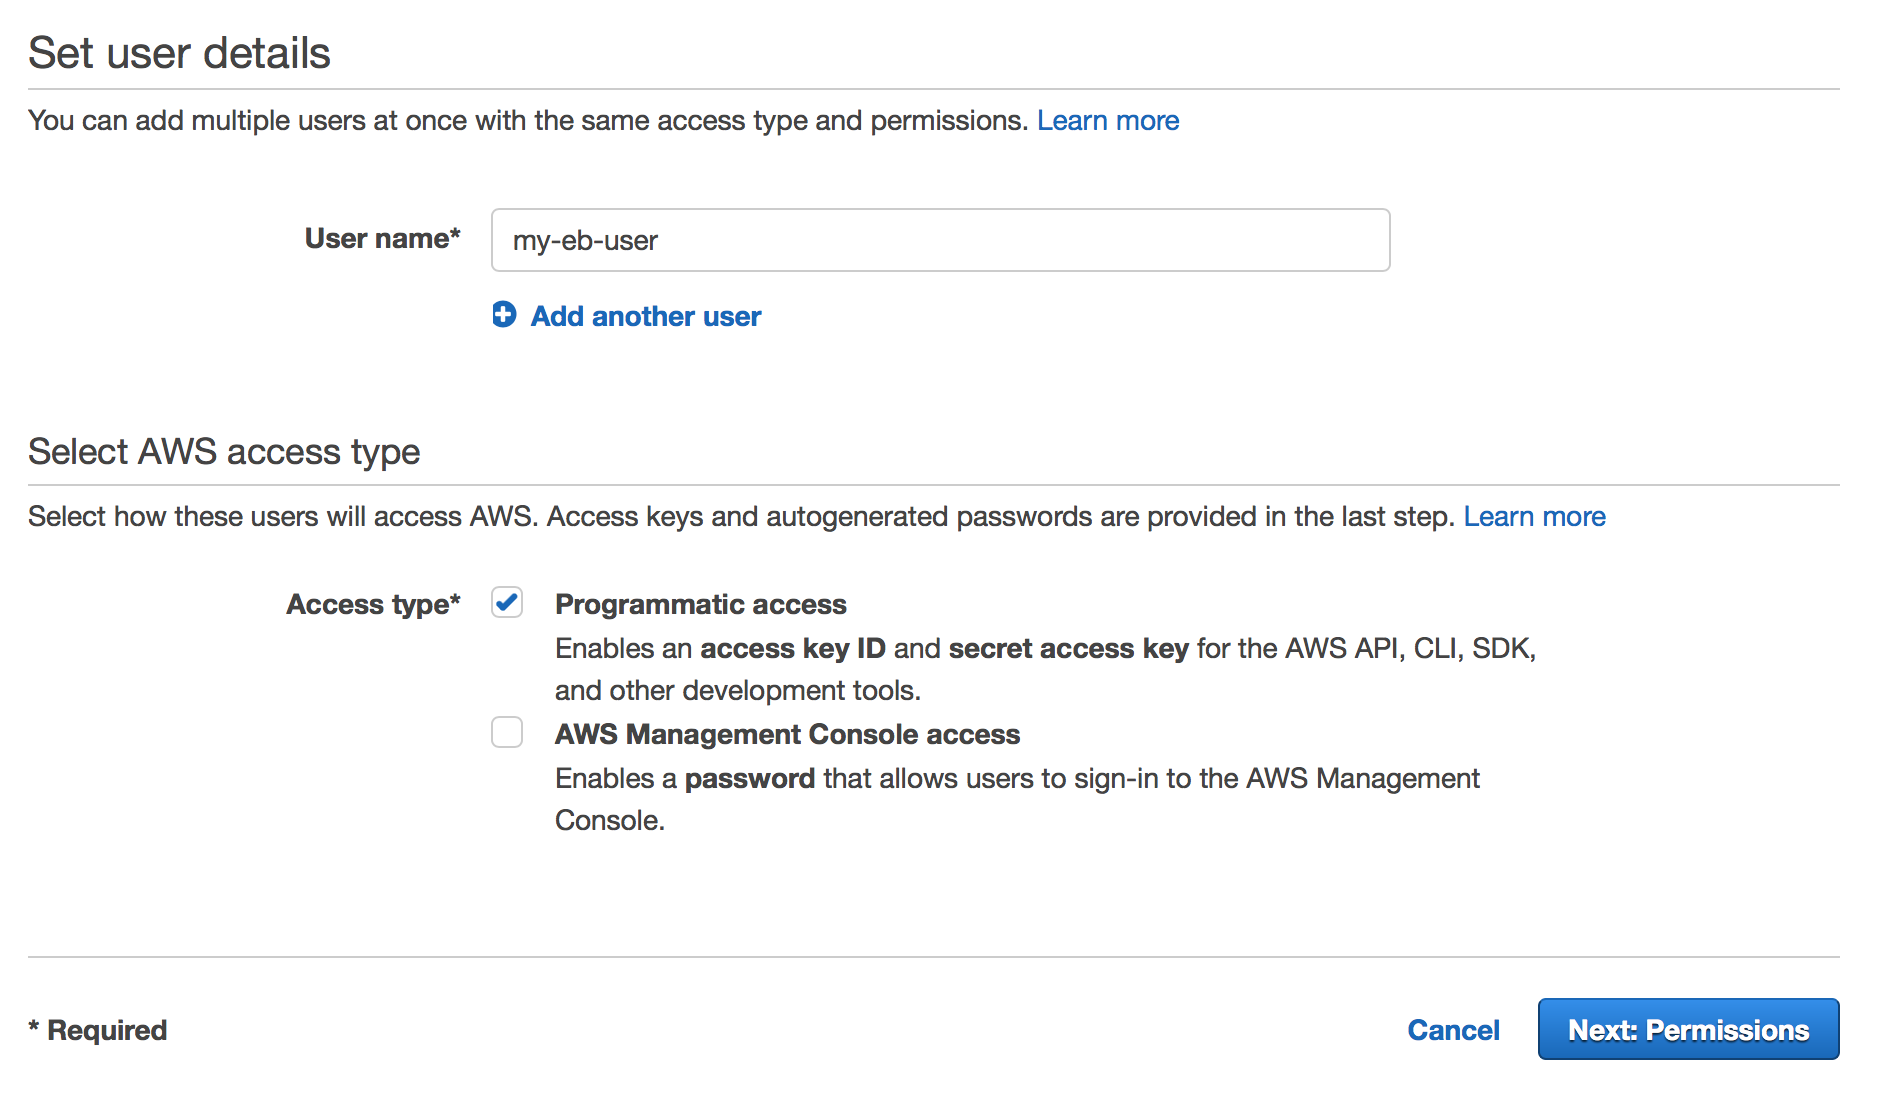
Let’s create a user specifically for our Elastic Beanstalk deployment. Visit the AWS IAM website here. On the sidebar, click Users. Hit the Add User button. Enter a name for the user and check Programmatic Access and hit Next.
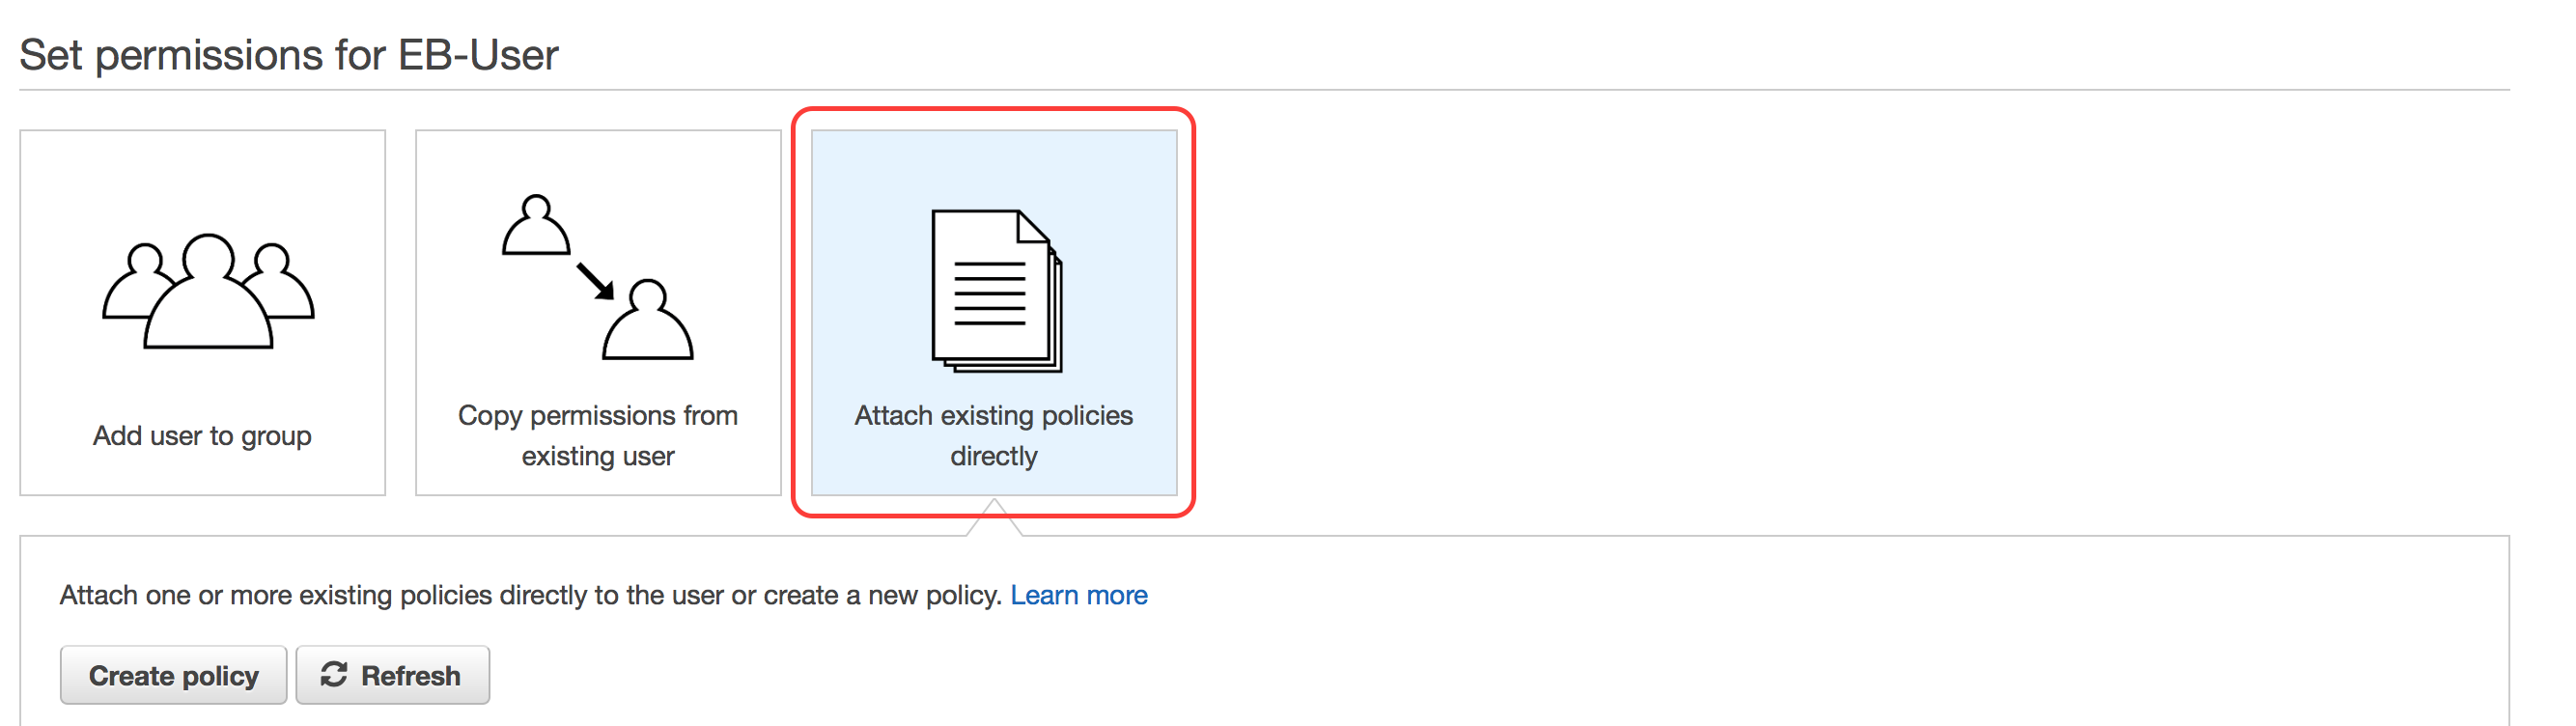
Hit the option for Attach existing policies directly.
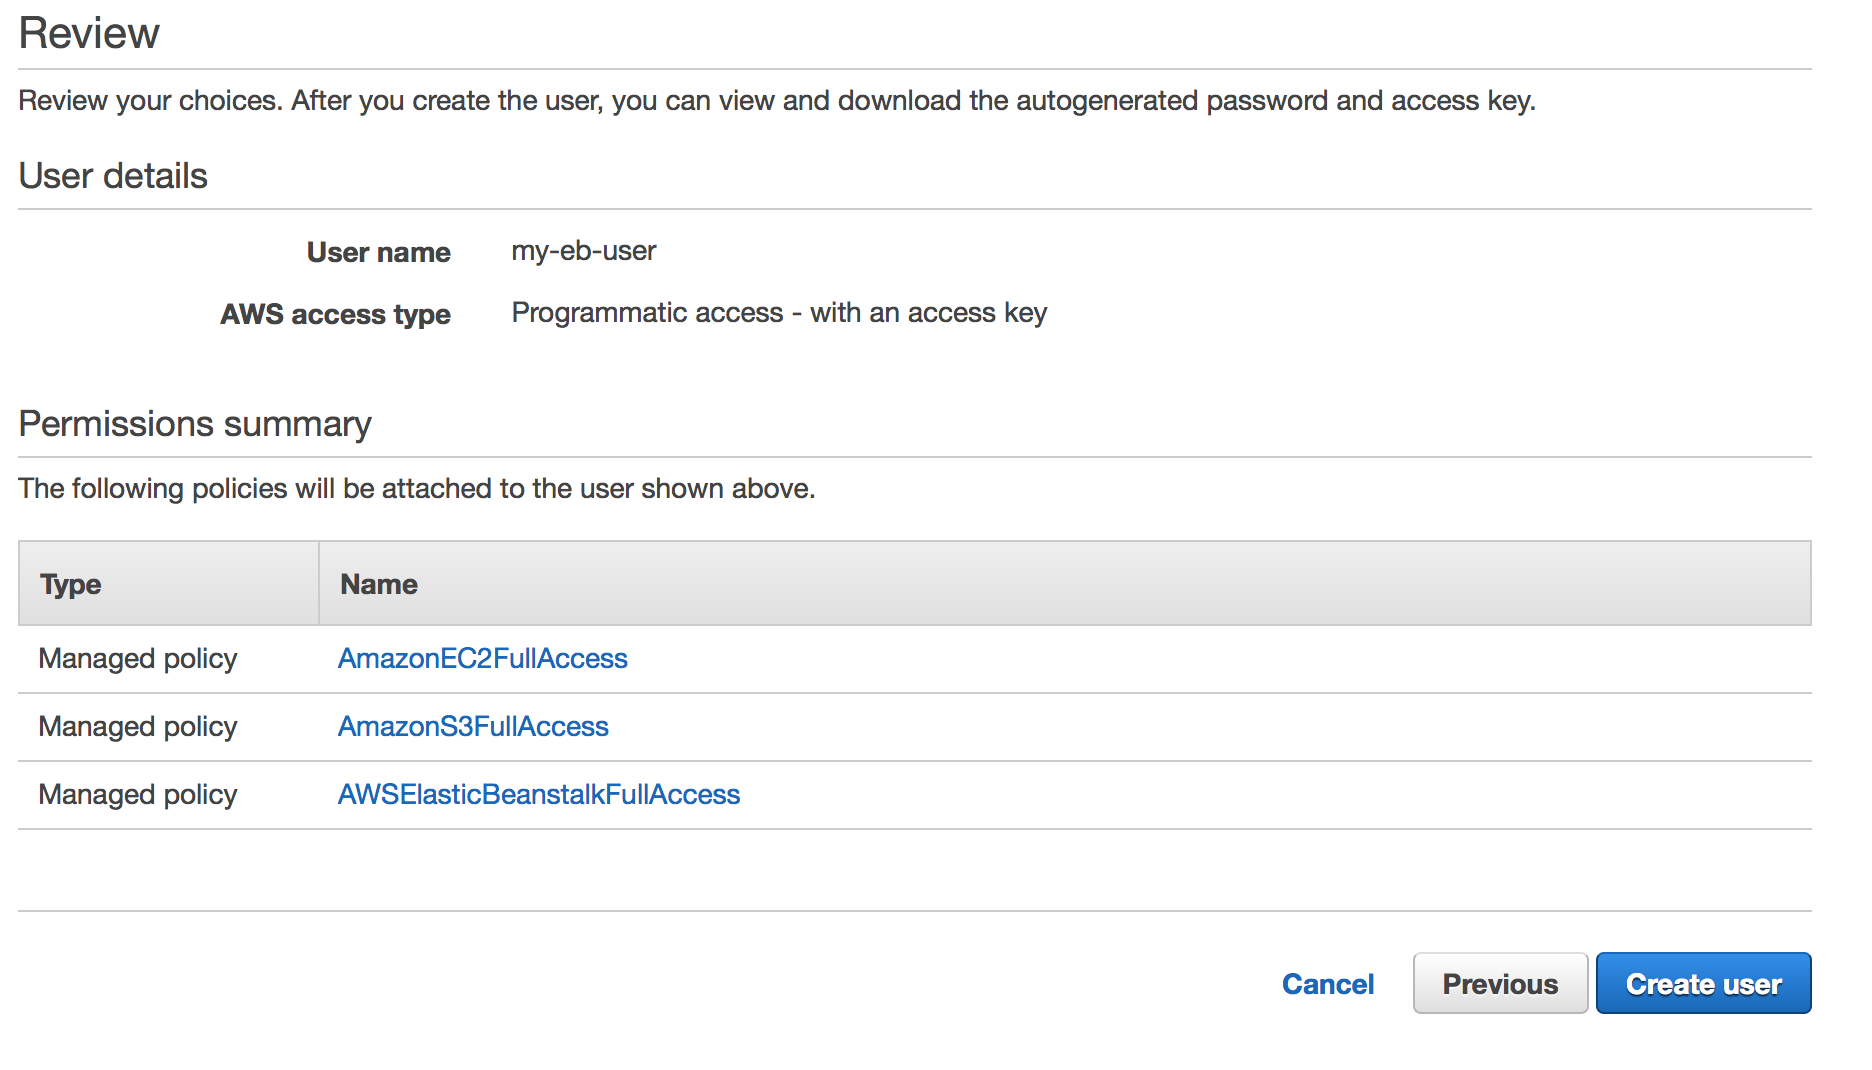
For purposes of this exercise, give the user AmazonEC2FullAccess, AmazonS3FullAccess, and AWSElasticBeanstalkFullAccess. You’ll want to refine these permissions for a production environment.
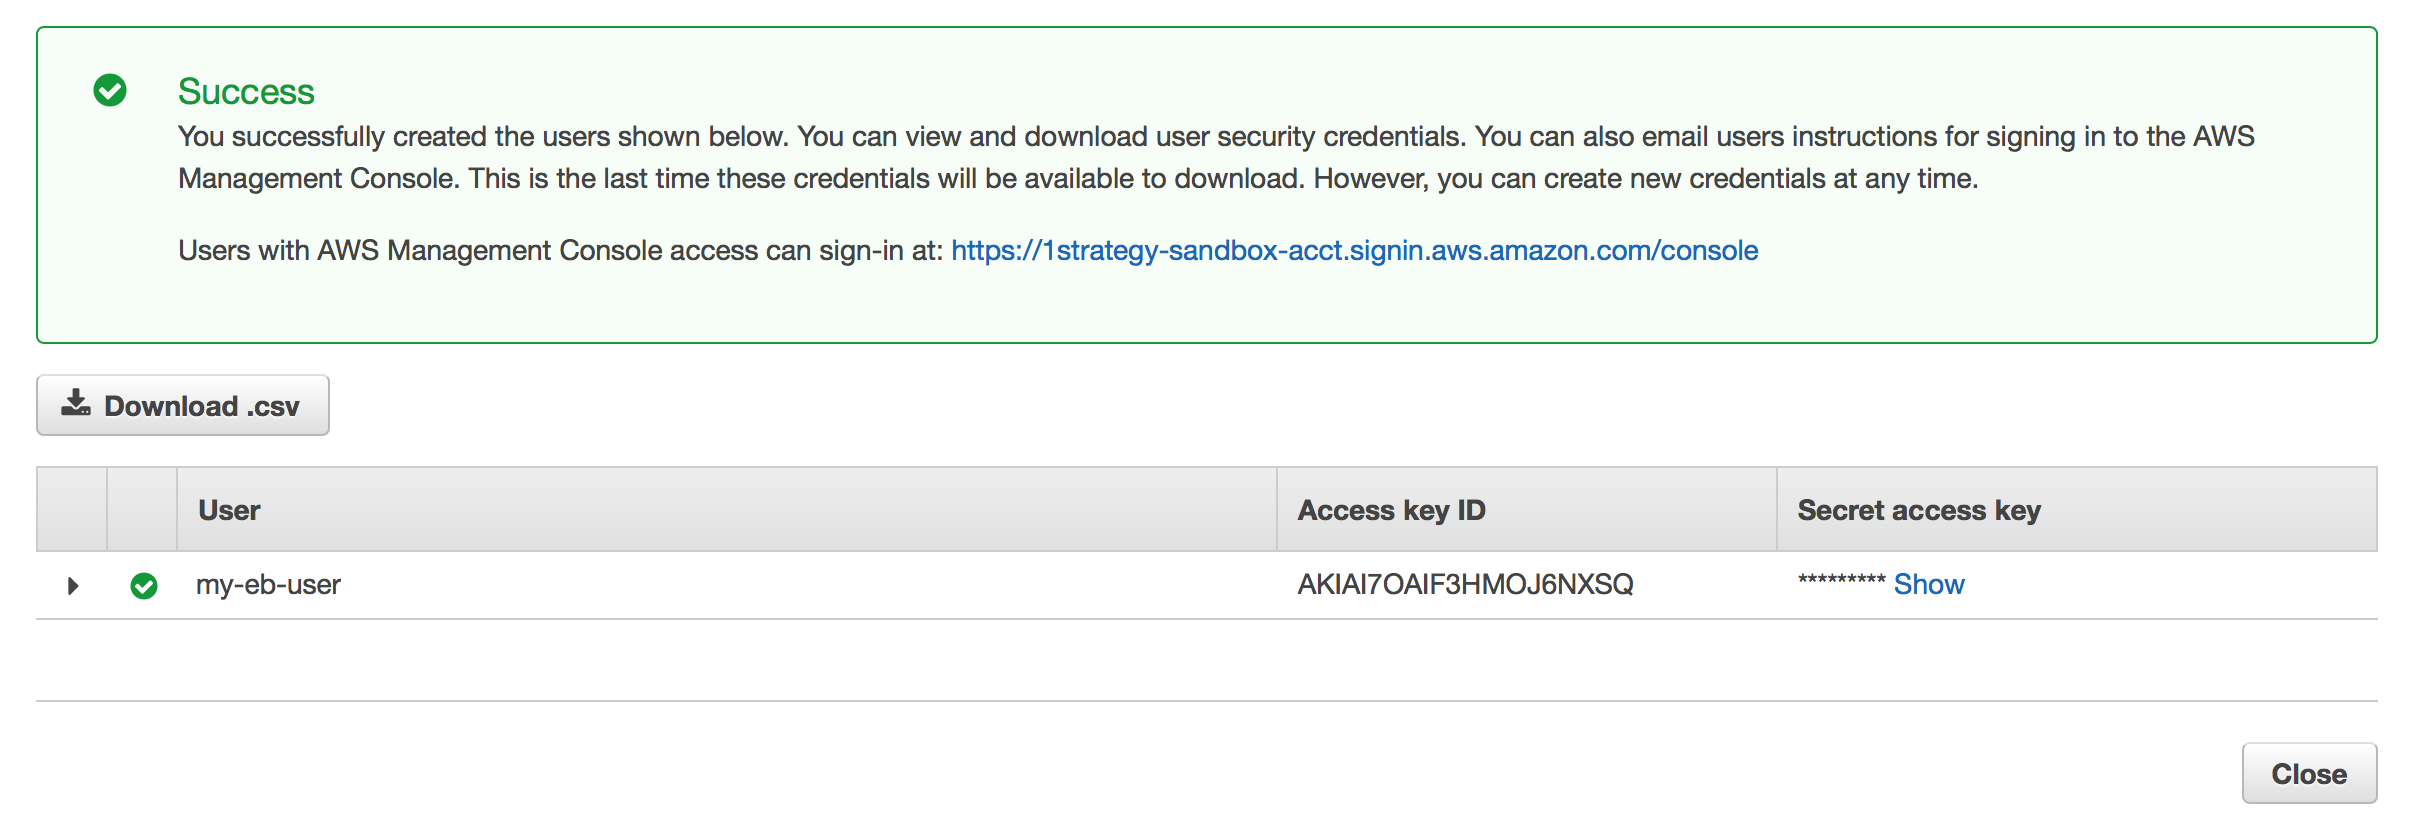
When you finish creating the user, make sure you download the CSV with your Access Keys! Once you hit close, you will no longer be able to access the secret key and there is no way to recover it! Make sure you keep your keys safe. Anyone with these keys can access resources in your AWS account.
When you’re finished, input these keys into the the terminal prompts for the EB CLI. You shouldn’t need to input these keys again in the CLI, but keep them for your records.
6. Creating our Elastic Beanstalk Applications
The next part of the eb init script has us create a new application. You may not see this exact screen because I already have another app. I’m going to choose option 2 to create a new application.
Select an application to use
1) my-other-app
2) [ Create new Application ]
(default is 2): 2

Enter Application Name
(default is "my_eb_site"):
Application my_eb_site has been created.
The next part of the script asks you for an Application Name (will be auto populated if you leave it blank), asks you if you’re using Python, and then asks which version of Python you want to use. Since I’m using Python 3, I will choose option 1 (If you’re using a version of Python newer than 3.4, you should be okay as long as you don’t use any syntax that’s specific to 3.5+ in your web app).
It appears you are using Python. Is this correct?
(y/n): y

Select a platform version.
1) Python 3.4
2) Python
3) Python 2.7
4) Python 3.4 (Preconfigured - Docker)
(default is 1): 1
Next, you’ll be asked if you want to use AWS CodeCommit. We aren’t using CodeCommit so let’s say no.
Note: Elastic Beanstalk now supports AWS CodeCommit; a fully-managed source control service. To learn more, see Docs: https://aws.amazon.com/codecommit/
Do you wish to continue with CodeCommit? (y/N) (default is n):
You will then be asked if you want to enable SSH. In my case, I’d like to have SSH for troubleshooting reasons.
Do you want to set up SSH for your instances?
(y/n): y
This will ask you to create a new key pair or use a previously existing one. I'm going to use a previously existing one.
Select a keypair.
1) aws-eb
2) [ Create new KeyPair ]
(default is 2): 1
After this, we are almost ready to have the EB CLI deploy our code. There's still a couple more configuration items that we need to address.
7. Additional Configuration Items
Now before we use eb to create our instance in the cloud, we need to make some additional configuration settings.
First, we need to "freeze" our packages installed with pip into a requirements file so our Elastic Beanstalk instance will automatically install them. This is done with:
pip freeze > requirements.txt
Next, we'll need to adjust some of the default configuration settings. We'll need to create a .ebextensions folder and a configuration file:
You'll need to adjust where it says "my_eb_site" to whatever you named your Django project.
In addition to this, we'll need to make sure we have Elastic Beanstalk install the PostgreSQL development libraries on our EC2 instance. If we don't do this, we'll get an error when we deploy our Django site to EB because it won't be able to install psycopg2. So add the following:
packages:
  yum:
    postgresql95-devel: []
We're almost ready to go! We need to change a couple more settings in our Django project in order for us to get this instance created.
Since we want to create an RDS instance with an EC2 instance on Elastic Beanstalk, we need to put the RDS database settings into our settings.py file. Luckily, EB has some global python variables that we can put into our settings that make it pretty easy. We'll put this code in an if-else statement so our database environment will still work on our development machine. Feel free to adjust your local environment to the required settings.
We'll also want to make sure our models files migrate when we start our instance. In order to do this we'll need to add another few lines to our .ebextensions/python.config file.
The STATIC_ROOT variable tells Django to place static files in our app's directory under www/static. We reference this in the python.config by adding the StaticFiles: "/static/=www/static/" line. This line tells Elastic Beanstalk to create an alias in the Apache configuration to map the /static URL to our app's directory/www/static.
So our full .ebextensions/python.config should look like this now:
The leader_only flag is optional. As noted here, it only runs the command on a single instance chosen by Elastic Beanstalk. Leader-only container commands are run before other container commands. A command can be leader-only or have a test, but not both (leader_only takes precedence). We only want to migrate our database once. So let's leave the leader_only flag set for that command.
Let's make sure to commit all these changes so that we can deploy them to our instance:
Now that we've gotten everything ready, let's deploy our instance! This can be done with the eb create command.
This command has default settings of auto scaling and no database. The auto scaling group defaults to 1 instance with a max of 4. If you don't want to scale out, you can adjust your application settings on the Elastic Beanstalk main page, or we can add --scale 1 flags to our create command. This tells EB that we only want 1 instance of our web app regardless of load. This also means that if our instance goes down, the ASG will automatically start another instance. Alternatively, we can specify --single to ensure we only have a single EC2 instance for our Elastic Beanstalk app that doesn't spin up anything else once that instance dies.
So what if we want a database? According to the eb createdocumentation, we can add the -db flag to our create command. However, this defaults to the MySQL database engine. But we want PostgreSQL! So how do we do this? We add another flag, -db.engine postgres to our command. We can also specify our instance size with -db.i <instance type>. I will use db.t2.micro(You will get an error if you use any instance smaller than this for Postgres in RDS). So our full command to create the instance would be:
When you run this command you'll get a couple prompts asking you to name your environment and choose a CNAME record for your subdomain at elasticbeanstalk.com. If the CNAME is taken, you'll be asked to choose a different one.
$ eb create --scale 1 -db -db.engine postgres -db.i db.t2.micro
Enter Environment Name
(default is my-eb-site-dev):
Enter DNS CNAME prefix
(default is my-eb-site-dev):
That cname is not available. Please choose another.
Enter DNS CNAME prefix
(default is my-eb-site-dev):
If you've chosen --scale rather than --single, you'll be prompted for a load balancer type:
Select a load balancer type
1) classic
2) application
(default is 1):
I won't go into details about the differences between classic and application load balancers in this article, but you can read more about them here. For let's go with the default option (classic load balancer).
The next prompt that shows up is for database creation. You'll choose a root database user and password.
Enter an RDS DB username (default is "ebroot"):
Enter an RDS DB master password:
Retype password to confirm:
After this, the EB CLI will upload your latest git commit to Amazon S3 and create EC2 and RDS instances. The EB CLI will output the following:
Creating application version archive "app-db8b-170522_131626".
Uploading my_eb_site/app-db8b-170522_131626.zip to S3. This may take a while.
Upload Complete.
Environment details for: my-eb-site-dev
  Application name: my_eb_site
  Region: us-west-2
  Deployed Version: app-db8b-170522_131626
  Environment ID: e-j2rpw49g5b
  Platform: arn:aws:elasticbeanstalk:us-west-2::platform/Python 3.4 running on 64bit Amazon Linux/2.4.0
  Tier: WebServer-Standard
  CNAME: my-eb-site-dev.us-west-2.elasticbeanstalk.com
  Updated: 2017-05-22 19:16:30.224000+00:00
Printing Status:
INFO: createEnvironment is starting.
INFO: Using elasticbeanstalk-us-west-2-842337631775 as Amazon S3 storage bucket for environment data.
 -- Events -- (safe to Ctrl+C)
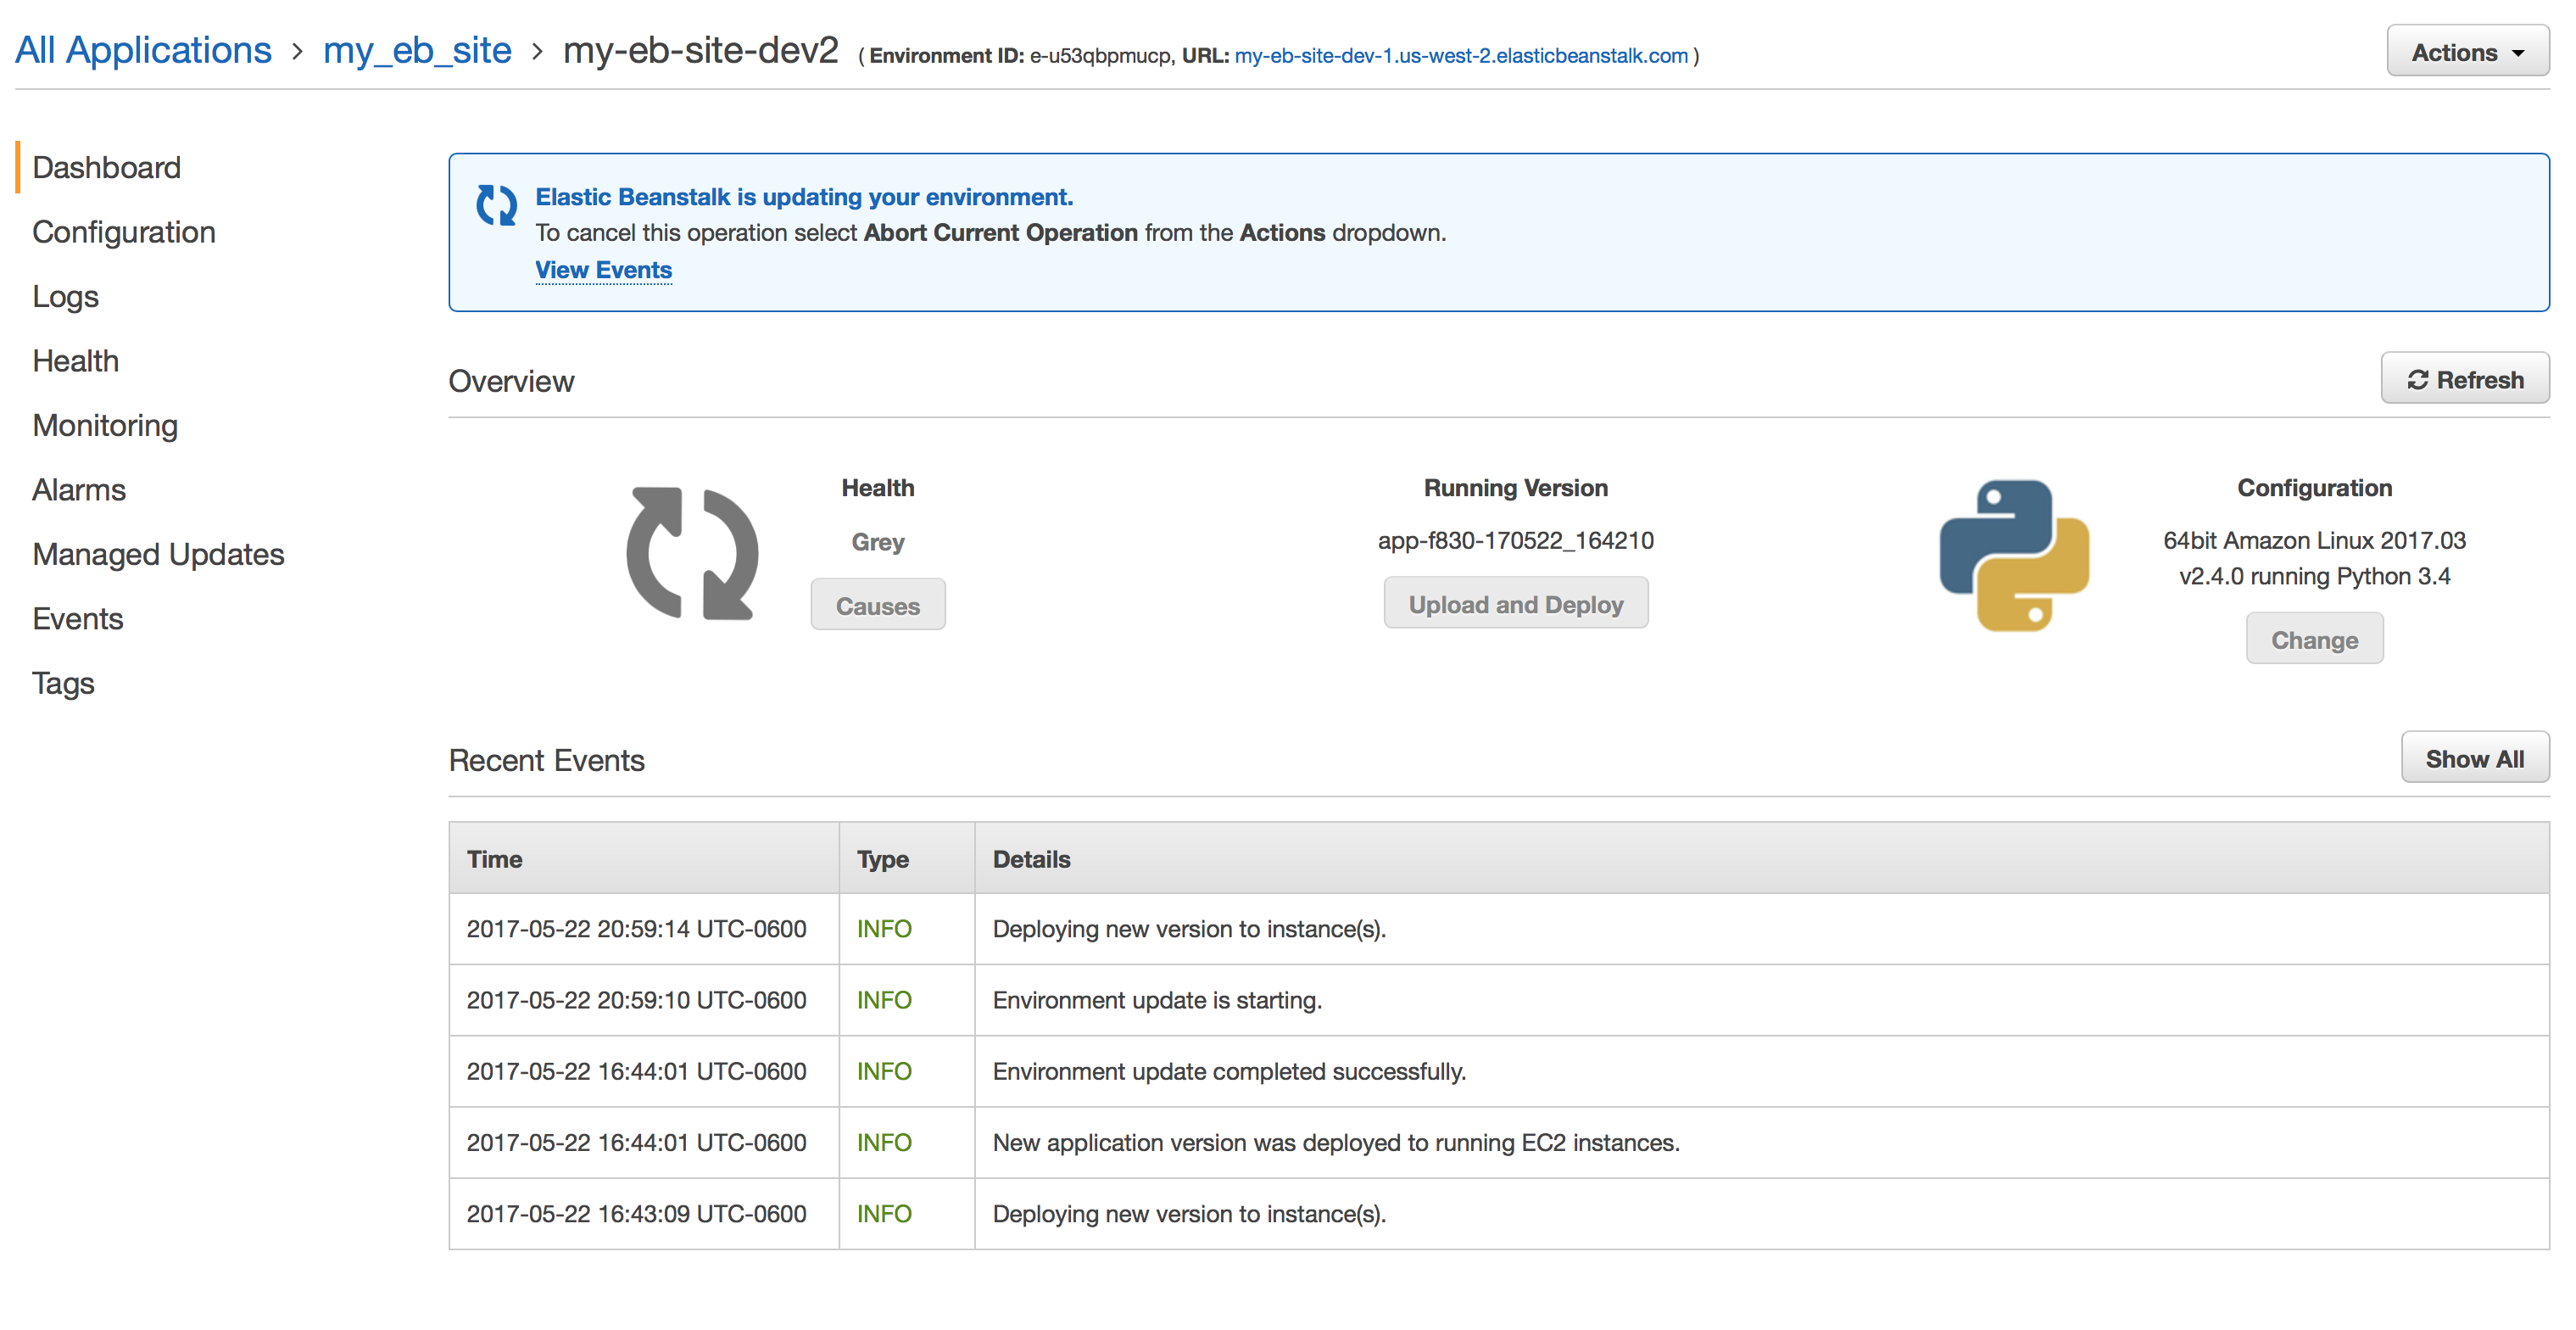
It will take anywhere from 10-20 minutes for Elastic Beanstalk to fully create the necessary instances and start the web app. If you prefer to do other things with your terminal during this time, feel free to hit Ctrl+C once you see that it's safe to do so. EB will continue deployment in the cloud. You can view it's progress by visiting your app's profile page. This can be found by going to the Elastic Beanstalk main page. After clicking on your app, you'll see something similar to this:
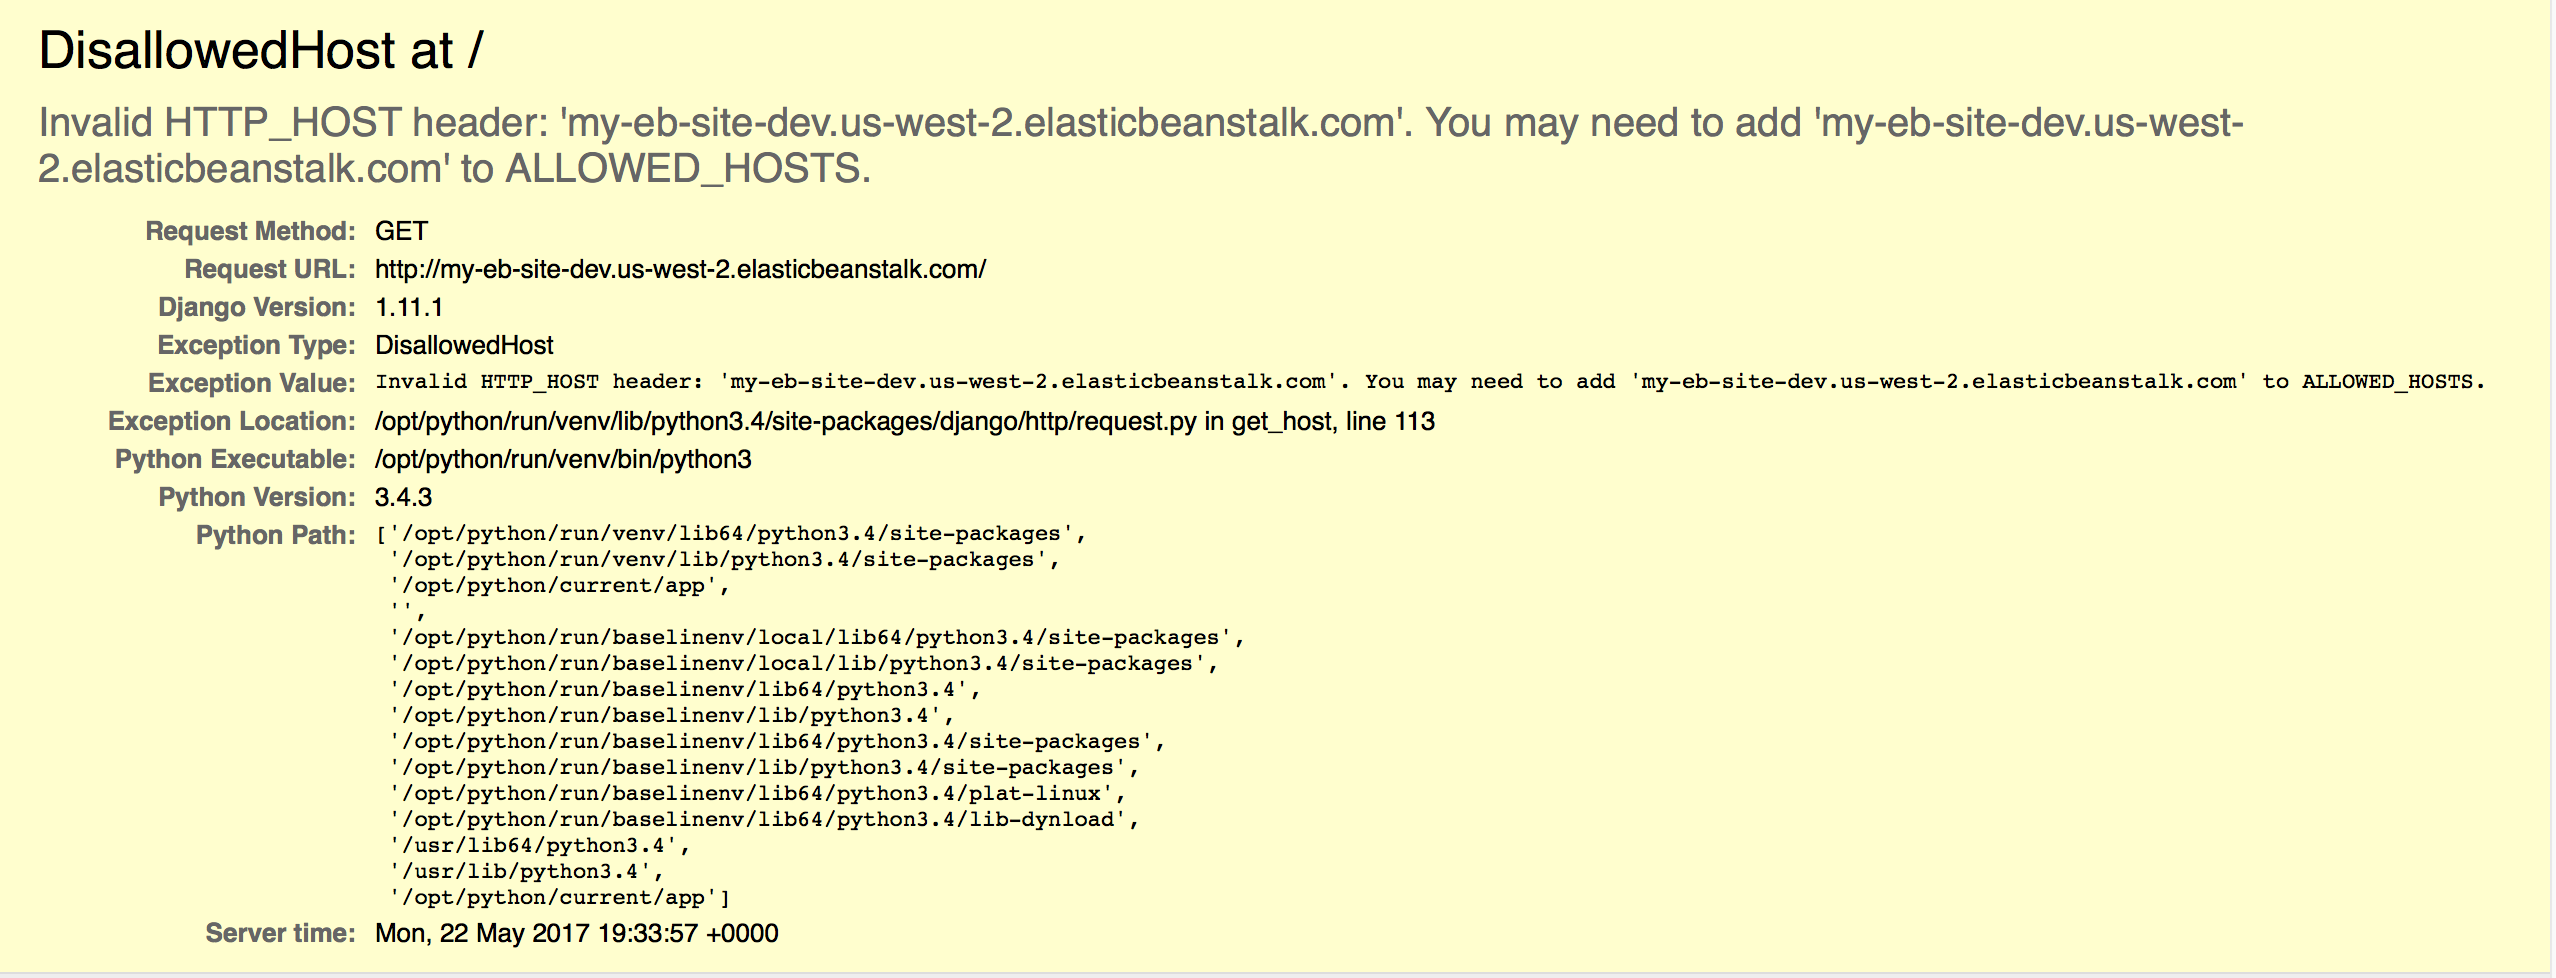
If you watch the progress, you'll see that EB will create an S3 bucket and upload your code, create an auto scaling group, create an RDS instance, and create an EC2 instance. This process can take quite a while. Once you're app has been fully provisioned, you should be able to go to your site URL on elasticbeanstalk.com and see your site. You can find this on your app's status page. Mine is my-eb-site-dev.us-west-2.elasticbeanstalk.com. Here's what my website shows:
That's not what we expected, right? This is a Django specific error that we'll learn how to fix this in the next section.
9. Making Changes and pushing them to Elastic Beanstalk
Each time you make changes to your code, you'll need to commit those changes with git. If changes are not committed, they won't be pushed to Elastic Beanstalk.
To fix the problem we ran into in the section above, we need to add our domain name to the list of ALLOWED_HOSTS and re-deploy the code. Add ..elasticbeanstalk.com to your list of allowed hosts:
git add .
git commit -m "Added my site to allowed hosts in Django"
To deploy changes to your live web app, run the following command:
eb deploy
After a couple minutes, our changes should be shown on our live site URL. Thankfully deploying code is much faster than provisioning the whole infrastructure again!
10. Creating a default 'superuser'
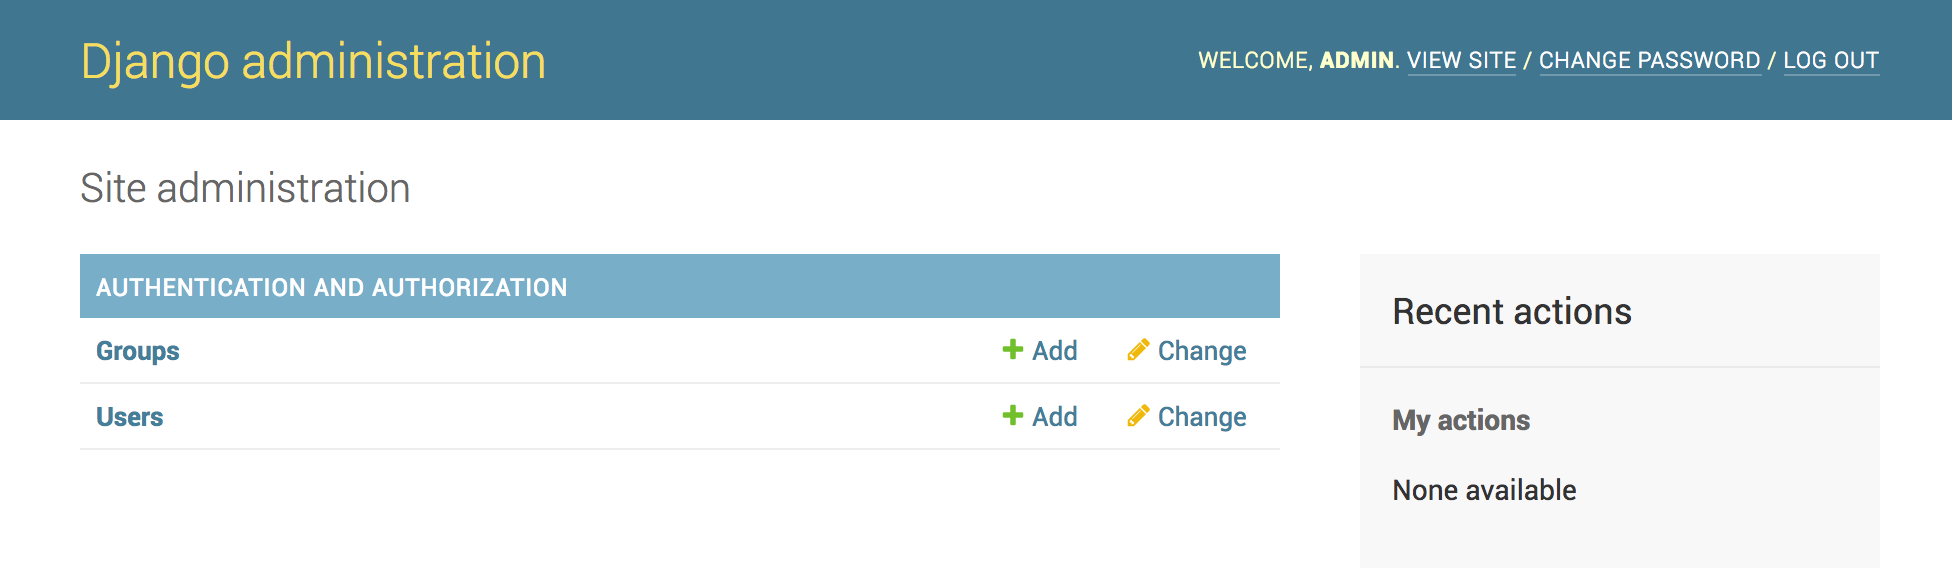
When we deploy our web app, our database is empty. What if our app has login capabilities? How are we supposed to login if we don't have any users? We can't use Django Admin's default createsuperuser command because it requires input in order to specify a password.This can be resolved by adding a create super user command to our Django app. To do this, we'll need to write custom django-admin commands. I'm assuming that you've kept the Django admin app enabled from when we created the Django app.
You'll need to create createsu.py file and a couple directories in your main app folder. My main app is homepage so in my case [Project Root]/homepage/management/commands/createsu.py is where I created it. In the createsu.py file, you'll need to insert the following code:
from django.core.management.base import BaseCommand, CommandError
from django.contrib.auth.models import User

class Command(BaseCommand):

    def handle(self, *args, **options):
        if not User.objects.filter(username="admin").exists():
            User.objects.create_superuser("admin", "admin@admin.com", "admin")
            self.stdout.write(self.style.SUCCESS('Successfully created new super user'))
As always, adjust this according to your needs.
You'll also need to make sure you add the appropriate __init__.py files as well. I just created blank files for these using the touch command. Here's where these __init__.py files go:
Try logging into your Django admin page by going to your Elastic Beanstalk URL/admin (For example: https://my-eb-site-dev.us-west-2.elasticbeanstalk.com/admin/).
Congratulations! You've just deployed your Django web app to AWS Elastic Beanstalk and RDS with Python 3, Django, and PostgreSQL!
This post is featured on the 1Strategy blog. 1Strategy is a close partner AWS that helps companies develop and use cloud computing solutions.
In business, information is crucial for making smart decisions. Most businesses require some type of centralized storage system. Paper logs, filing cabinets, or computer databases are all common types of systems to store business data. Computer databases and servers are becoming more and more popular even in small businesses. The need for computer servers in business is growing; however, choosing a server and a server operating system can be difficult to do. Linux servers provide excellent performance for a low cost.
This article will cover three questions:
1. What is Linux?
2. Which Linux distribution is right for me?
3. How much will a Linux server cost?
What is Linux?
Open Source. Linux is an Open Source operating system based on Unix. “Open Source” means that the source code is publicly available and freely distributed, but it doesn’t mean one can do anything they want with it.1 On the Linux kernel development page, the following description is found:
Linux is a clone of the operating system Unix, written from scratch by Linus Torvalds with assistance from a loosely-knit team of hackers across the Net. It aims towards POSIX and Single UNIX Specification compliance.
It has all the features you would expect in a modern fully-fledged Unix, including true multitasking, virtual memory, shared libraries, demand loading, shared copy-on- write executables, proper memory management, and multistack networking including IPv4 and IPv6.2
History. The beginnings of the modern Linux operating system (or OS) began in August 1991 when a computer scientist student named Linus Torvalds posted on a Usenet group about a project he had been working on. He didn’t think
his hobbyist project would get far, but Linux quickly snowballed into what we have today.3
Linux Today. In the last decade, Linux has changed significantly and is used in many different capacities in today’s world.4
Linux began as a server OS and eventually became a useful desktop OS. Linux is also found in many mobile phones and similar devices.5
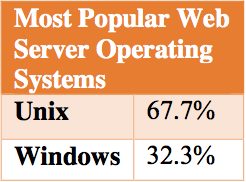
As a server OS, Linux powers a large majority of the web with either Apache or Nginx web
Figure 1 Percentage of web servers running either Unix or Windows based operating systems.7
server software, which are both open source. Along with Apache and Nginx, a variety of database back ends are used, namely PostgreSQL and MySQL.6 Figure 1 shows the percentage of Unix/Linux servers running websites today. Unix/Linux servers power about two-thirds of all websites on the web today.
Many large companies rely on Linux for business operations. Google, Twitter, Facebook, Amazon, and even McDonald’s are all major companies using Linux.8
Which Linux distribution is right for me?
Flavors. Linux has a variety of “flavors” to choose from. Each distribution has different areas of focus. With so many different options, it can be hard to choose the right one. Figure 2 lists the top ten Linux server distributions available today.
Each of the Linux distributions described in the Figure 2 has a specific purpose. Some work better in certain areas than others. For general server purposes (i.e., hosting a website, database, etc.) almost any distribution will work well.
 Ubuntu. Ubuntu is one of the best Linux server OSes around. The operating system is feature- packed and user-friendly. ServerWatch.com describes it as the following:
Ubuntu [is] at the top of almost every Linux- related list…. [T]he Debian-based Ubuntu is in a class by itself. Canonical’s Ubuntu surpasses all other Linux server distributions — from its simple installation to its excellent hardware discovery to its world- class commercial support, Ubuntu leaves the others fumbling in the dusty distance.9
Figure 2 Top 10 most popular distributions of Linux for server operations.10
How much will a Linux server cost?
Linux OSes have a lower cost of ownership than Microsoft’s Windows Server, making Linux an attractive prospect for IT professionals. Linux also helps prevent companies from being locked into a specific vendor for software and hardware support.11
Generally, most Linux distributions are free to use with no official technical support. Some Linux distributions are developed by commercial companies (e.g., SUSE Linux Enterprise is developed by Novell, Red Hat Enterprise Linux is developed by Red Hat). Although these may be free to download and install, technical support will be limited unless a tech support subscription fee is paid.12
Most Linux support packages will cost anywhere from a few hundred to a few thousand dollars per year, depending on how many processors and cores the server has and what capacity the server is providing (e.g., entry level, virtual datacenter, workstation, etc). Red Hat Enterprise Linux offers both standard and premium subscriptions that range from $799 – 5,400 for a standard subscription, and $1,299 – 8,600 per year.13
Windows Server uses client access licenses (CAL) for various capacities. One must purchase a specified number of CALs for the amount of users needed to access the system. Five CALs can cost as little as $572, but twenty-five CALs cost $3,730 and five hundred CALs cost $81,850.14
Linux can cost as little as nothing or up to a few thousand dollars a year. Depending on the usage situation, Linux can be a cheaper alternative to Windows Server.
Overall Linux provides great solutions for businesses and IT professionals. The OS has a long history of reliability and performance. Linux can be used to fill virtually any server roll with any one of the many OS distribution available. With such low costs, Linux is a great choice for any business.
Endnotes
1. “The Open Source Definition.” The Open Source Initiative. Accessed February 26, 2015. https://opensource.org/osd. 2. Linus Torvalds. “Torvalds/linux.” GitHub. October 28, 2012. Accessed February 26, 2015. https://github.com/torvalds/linux. 3. Brian Proffitt. “What Is Linux: An Overview of the Linux Operating System.” Linux.com. April 3, 2009. Accessed February 26, 2015. https://www.linux.com/learn/new-user- guides/376. 4. Przemyslaw Chmielecki. “Linux Myth. Open Source Software in Information Society.” Varazdin Development and Entrepreneurship Agency (VADEA), Oct 24, 2014. Accessed February 25, 2015. https://search.proquest.com/docview/1621414 396?accountid=4488. 5. Ibid. 6. “August 2013 Web Server Survey.” Netcraft. August 9, 2013. Accessed February 26, 2015. https://news.netcraft.com/archives/2013/08/09/august-2013-web- server-survey.html. 7. “W3Techs – World Wide Web Technology Surveys.” W3Techs. Accessed March 3, 2015. https://w3techs.com. 8. Avishek Kumar. “30 Big Companies and Devices Running on GNU/Linux.” Tecmint Linux. February 24, 2014. Accessed March 3, 2015. https://www.tecmint.com/big-companies- and-devices-running-on-gnulinux/. 9. Hess Katherine. “The Top 10 Linux Server Distributions.” ServerWatch.com. August 26, 2010. Accessed March 3, 2015. https://www.serverwatch.com/columns/article.php /3900711/The-Top-10-Linux-Server-Distributions.htm. 10. “Search Distributions.” DistroWatch.com. Accessed February 26, 2015. https://distrowatch.com/search.php?category=Server. 11. “Suse Study shows Linux Entrenched in the Enterprise.” Wireless News. August 16, 2013. https://search.proquest.com/docview/1426313452?accountid=448 12. “Red Hat Store.” Redhat.com. Accessed February 26, 2015. https://www.redhat.com/wapps/store/catalog.html. 13. Ibid. 14. “Savings Using Linux over Windows.” 2X. Accessed March 3, 2015. https://www.2x.com/learn/whitepapers/savings- using-linux/.