Linux Servers: A Brief Overview

In business, information is crucial for making smart decisions. Most businesses require some type of centralized storage system. Paper logs, filing cabinets, or computer databases are all common types of systems to store business data. Computer databases and servers are becoming more and more popular even in small businesses. The need for computer servers in business is growing; however, choosing a server and a server operating system can be difficult to do. Linux servers provide excellent performance for a low cost.

This article will cover three questions:

1. What is Linux?
2. Which Linux distribution is right for me?
3. How much will a Linux server cost?

What is Linux?

Open Source. Linux is an Open Source operating system based on Unix. “Open Source” means that the source code is publicly available and freely distributed, but it doesn’t mean one can do anything they want with it.1 On the Linux kernel development page, the following description is found:

Linux is a clone of the operating system Unix, written from scratch by Linus Torvalds with assistance from a loosely-knit team of hackers across the Net. It aims towards POSIX and Single UNIX Specification compliance.
It has all the features you would expect in a modern fully-fledged Unix, including true multitasking, virtual memory, shared libraries, demand loading, shared copy-on- write executables, proper memory management, and multistack networking including IPv4 and IPv6.2

History. The beginnings of the modern Linux operating system (or OS) began in August 1991 when a computer scientist student named Linus Torvalds posted on a Usenet group about a project he had been working on. He didn’t think
his hobbyist project would get far, but Linux quickly snowballed into what we have today.3

Linux Today. In the last decade, Linux has changed significantly and is used in many different capacities in today’s world.4

Linux began as a server OS and eventually became a useful desktop OS. Linux is also found in many mobile phones and similar devices.5

As a server OS, Linux powers a large majority of the web with either Apache or Nginx web

Most Popular Web Server Operating Systems
Figure 1 Percentage of web servers running either Unix or Windows based operating systems.7

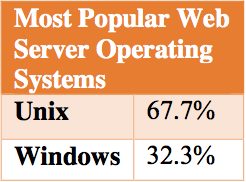
server software, which are both open source. Along with Apache and Nginx, a variety of database back ends are used, namely PostgreSQL and MySQL.6 Figure 1 shows the percentage of Unix/Linux servers running websites today. Unix/Linux servers power about two-thirds of all websites on the web today.

Many large companies rely on Linux for business operations. Google, Twitter, Facebook, Amazon, and even McDonald’s are all major companies using Linux.8

Which Linux distribution is right for me?

Flavors. Linux has a variety of “flavors” to choose from. Each distribution has different areas of focus. With so many different options, it can be hard to choose the right one. Figure 2 lists the top ten Linux server distributions available today.
Each of the Linux distributions described in the Figure 2 has a specific purpose. Some work better in certain areas than others. For general server purposes (i.e., hosting a website, database, etc.) almost any distribution will work well.

Ubuntu. Ubuntu is one of the best Linux server OSes around. The operating system is feature- packed and user-friendly. ServerWatch.com describes it as the following:

Ubuntu [is] at the top of almost every Linux- related list…. [T]he Debian-based Ubuntu is in a class by itself. Canonical’s Ubuntu surpasses all other Linux server distributions — from its simple installation to its excellent hardware discovery to its world- class commercial support, Ubuntu leaves the others fumbling in the dusty distance.9

Top 10 Most Popular Linux Server Distributions (as of Feb 2015)
Figure 2 Top 10 most popular distributions of Linux for server operations.10

How much will a Linux server cost?

Linux OSes have a lower cost of ownership than Microsoft’s Windows Server, making Linux an attractive prospect for IT professionals. Linux also helps prevent companies from being locked into a specific vendor for software and hardware support.11

Generally, most Linux distributions are free to use with no official technical support. Some Linux distributions are developed by commercial companies (e.g., SUSE Linux Enterprise is developed by Novell, Red Hat Enterprise Linux is developed by Red Hat). Although these may be free to download and install, technical support will be limited unless a tech support subscription fee is paid.12

Most Linux support packages will cost anywhere from a few hundred to a few thousand dollars per year, depending on how many processors and cores the server has and what capacity the server is providing (e.g., entry level, virtual datacenter, workstation, etc). Red Hat Enterprise Linux offers both standard and premium subscriptions that range from $799 – 5,400 for a standard subscription, and $1,299 – 8,600 per year.13

Windows Server uses client access licenses (CAL) for various capacities. One must purchase a specified number of CALs for the amount of users needed to access the system. Five CALs can cost as little as $572, but twenty-five CALs cost $3,730 and five hundred CALs cost $81,850.14

Linux can cost as little as nothing or up to a few thousand dollars a year. Depending on the usage situation, Linux can be a cheaper alternative to Windows Server.

Overall Linux provides great solutions for businesses and IT professionals. The OS has a long history of reliability and performance. Linux can be used to fill virtually any server roll with any one of the many OS distribution available. With such low costs, Linux is a great choice for any business.


Endnotes

1. “The Open Source Definition.” The Open Source Initiative. Accessed February 26, 2015. https://opensource.org/osd.
2. Linus Torvalds. “Torvalds/linux.” GitHub. October 28, 2012. Accessed February 26, 2015. https://github.com/torvalds/linux.
3. Brian Proffitt. “What Is Linux: An Overview of the Linux Operating System.” Linux.com. April 3, 2009. Accessed February 26, 2015. https://www.linux.com/learn/new-user- guides/376.
4. Przemyslaw Chmielecki. “Linux Myth. Open Source Software in Information Society.” Varazdin Development and Entrepreneurship Agency (VADEA), Oct 24, 2014. Accessed February 25, 2015. https://search.proquest.com/docview/1621414 396?accountid=4488.
5. Ibid.
6. “August 2013 Web Server Survey.” Netcraft. August 9, 2013. Accessed February 26, 2015. https://news.netcraft.com/archives/2013/08/09/august-2013-web- server-survey.html.
7. “W3Techs – World Wide Web Technology Surveys.” W3Techs. Accessed March 3, 2015. https://w3techs.com.
8. Avishek Kumar. “30 Big Companies and Devices Running on GNU/Linux.” Tecmint Linux. February 24, 2014. Accessed March 3, 2015. https://www.tecmint.com/big-companies- and-devices-running-on-gnulinux/.
9. Hess Katherine. “The Top 10 Linux Server Distributions.” ServerWatch.com. August 26, 2010. Accessed March 3, 2015. https://www.serverwatch.com/columns/article.php /3900711/The-Top-10-Linux-Server-Distributions.htm.
10. “Search Distributions.” DistroWatch.com. Accessed February 26, 2015. https://distrowatch.com/search.php?category=Server.
11. “Suse Study shows Linux Entrenched in the Enterprise.” Wireless News. August 16, 2013. https://search.proquest.com/docview/1426313452?accountid=448
12. “Red Hat Store.” Redhat.com. Accessed February 26, 2015. https://www.redhat.com/wapps/store/catalog.html.
13. Ibid.
14. “Savings Using Linux over Windows.” 2X. Accessed March 3, 2015. https://www.2x.com/learn/whitepapers/savings- using-linux/.

How to Customize an Ubuntu Installation Disc – The Right Way (14.04 Compatible!)

This disappeared off this blog earlier this month, so I thought I’d repost it here. I take no credit for any of this.


If you’re like me, you’ve wanted to customize an Ubuntu install DVD for a long time – but all the tools/directions for doing it are out of date and/or broken. Look no further!

I have successfully customized an ISO of Xubuntu 14.04 for my project Builduntu but this guide should work for just about any flavor of Ubuntu, maybe even other Linux distributions. If you aren’t sure, give it a try! Mint and Debian are very similar and may work with minimal changes to the commands (ie, replace apt-get with whatever package manager the particular distro uses). It helps if the distro you want to customize is the same as what you are running currently, but is not necessary.


Let’s get to it.

First download the ISO you’d like to start customizing from Ubuntu’s release server here. Remember where you save it, because you’re going to have to move it in a minute.

From here on out, it’s bash command line. Don’t worry, it’s the easiest way of doing this (for now). You don’t need to be a Linux guru, just pay close attention to the directions and it will work fine.

Make sure the prerequisite software is installed for unpacking and repacking the image. Open a terminal and run:

sudo apt-get install squashfs-tools genisoimage

Create a fresh folder to begin work. For the purposes of this guide, everything will be done from the starting point of the user’s home directory (indicated in Linux by a tilde “~”). Approximately 10 gigabytes total of free hard drive space is required for decompressing the ISO filesystem and repackaging it at the end.

mkdir ~/custom-img

Move the base ISO downloaded in the first step to the working directory. From here on out, replace “ubuntu.iso” with the name of the image downloaded from the Ubuntu Release server ex. trusty-desktop-amd64.iso

mv /path/to/saved/ubuntu.iso ~/custom-img
cd ~/custom-img

Next, extract the contents of disc image.

mkdir mnt
sudo mount -o loop ubuntu.iso mnt
mkdir extract
sudo rsync --exclude=/casper/filesystem.squashfs -a mnt/ extract

Here’s where things start to get interesting. Extract the filesystem with the following commands:

sudo unsquashfs mnt/casper/filesystem.squashfs
sudo mv squashfs-root edit

You’re going to need network access from within the chroot environment to download and install updated/new packages. Essentially what’s happening is you are going to “log in” to a command line instance of the Ubuntu installation, separate from the host system. Perhaps a confusing concept to wrap your head around at first, but it makes sense when you think about it. Copy resolv.conf from your system into the freshly unpacked fs.

sudo cp /etc/resolv.conf edit/etc/

Mount a few important working directories:

sudo mount --bind /dev/ edit/dev
sudo chroot edit
mount -t proc none /proc
mount -t sysfs none /sys
mount -t devpts none /dev/pts

Now you are actually logged in to the installation instance as root. Neat. Before making changes, a few commands will make sure that everything goes smoothly while modifying packages.

export HOME=/root
export LC_ALL=C
dbus-uuidgen > /var/lib/dbus/machine-id
dpkg-divert --local --rename --add /sbin/initctl
ln -s /bin/true /sbin/initctl

OK, now you can start playing around. This guide is only going to cover adding and removing software, but it’s possible to customize just about anything. Things like custom backgrounds and settings are already documented elsewhere, but be careful! Many of the directions are outdated and the commands may need slight alterations to work correctly. I had to piece this guide together from a few different sources with a whole lot of dead reckoning.

Start by removing the packages you don’t want. Be sure to use the “purge” command so that the system will automatically uninstall and delete the package, which optimizes the space required for the ISO. When you execute purge, read the list of programs to be removed before you select “Y” and make absolutely sure you haven’t accidentally flagged a core system package via association.You will recognize this because the list will contain significantly more packages than those you selected.

apt-get purge package1 package2 package3

I personally remove games, scanning utilities (I don’t have a scanner) and default text editors like abiword and mousepad (geany is the best). Stay away from core components unless you know what you are doing.

Since I am customizing a 64-bit Ubuntu image, I need multiarch (i386) support for some of the programming libraries. The following command is not necessary for everyone, but I recommend it anyway.

dpkg --add-architecture i386

Update the software repositories and upgrade the remaining packages on the system.

apt-get update && apt-get upgrade

Add packages to the system the usual way:

apt-get install package1 package2 package3

You are almost there! Time to clean up:

apt-get autoremove && apt-get autoclean
rm -rf /tmp/* ~/.bash_history
rm /var/lib/dbus/machine-id
rm /sbin/initctl
dpkg-divert --rename --remove /sbin/initctl

Unmount the directories from the beginning of this guide:

umount /proc || umount -lf /proc
umount /sys
umount /dev/pts
exit
sudo umount edit/dev

You have now “logged out” of the installation environment and are “back” on the host system. These final steps will actually produce the ISO. Other guides stop working at this point, but have no fear! The following commands have been tested and verified.

Generate a new file manifest:

sudo chmod +w extract/casper/filesystem.manifest

sudo chroot edit dpkg-query -W --showformat='${Package} ${Version}\n' > extract-cd/casper/filesystem.manifest
(Note: You may need to be logged in as root to run the above command. I kept getting a permission denied error with only using the sudo).

sudo cp extract/casper/filesystem.manifest extract/casper/filesystem.manifest-desktop

sudo sed -i '/ubiquity/d' extract/casper/filesystem.manifest-desktop

sudo sed -i '/casper/d' extract/casper/filesystem.manifest-desktop

Compress the filesystem:

sudo mksquashfs edit extract/casper/filesystem.squashfs -b 1048576

Update filesystem size (needed by the installer):

printf $(sudo du -sx --block-size=1 edit | cut -f1) | sudo tee extract/casper/filesystem.size

Delete the old md5sum:

cd extract
sudo rm md5sum.txt

…and generate a fresh one: (single command, copy and paste in one piece)

find -type f -print0 | sudo xargs -0 md5sum | grep -v isolinux/boot.cat | sudo tee md5sum.txt

And finally, create the ISO. This is a single long command, be sure to copy and paste it in one piece and don’t forget the period at the end, it’s important:

sudo mkisofs -D -r -V "$IMAGE_NAME" -cache-inodes -J -l -b isolinux/isolinux.bin -c isolinux/boot.cat -no-emul-boot -boot-load-size 4 -boot-info-table -o ../name-of-your-custom-image.iso .

It takes a few minutes, but when that is done you will have a burnable/distributable ISO in your working directory (~/custom-img)

Have fun and good luck! Let me know how customizing works out for you!